Wordpress Website Translation & Localization
Why should you translate your WordPress website?
WordPress website translation is the first step in localization, opening your site up to visitors from new regions and making your products or services as compelling as possible in their own native language. Here are the most common reasons we hear from Bablic users who have expanded their sites with new languages: Enter new geographical markets all over the world Share products, services, or message in new geographical areas Reach local customers who speak a second or third language Improve user experience for site visitors worldwide Provide a culturally-tailored experience for a range of users In today’s global climate, the truth is that few businesses can afford not to localize their website. Fortunately, Bablic makes it easy.
Why choose Bablic for WordPress website localization?
Bablic makes it simple to translate your WordPress site in minutes. And with the WordPress translate plugin, it just takes a few clicks – no programming required. You’ll get advanced SEO features like custom URL structure, so your site pulls top ranking in every language along with local searches. Bablic works hand-in-hand with all WordPress themes, so you don’t have to worry about redesigning your site from scratch. It’s even 100% WooCommerce ready so your store can be up and running in no time. And Bablic’s easy-to-use Visual Editor lets you make sure your site looks terrific in every language – even right-to-left languages that can mess up site formatting. Plus, it’s super-easy to add custom photos and graphics for each new language, creating a highly customized site at a fraction of the price, with none of the hassle or headaches. Finally, Bablic walks you through the entire process, showing you step by step how to translate a WordPress website so your site ends up looking and performing at its very best.
Translate Your Wordpress Site with Bablic
Follow the step-by-step Bablic X Wordpress integration tutorial below and achieve complete Wordpress localization within minutes. Yes, minutes.
1) Add the Bablic Localization Plugin
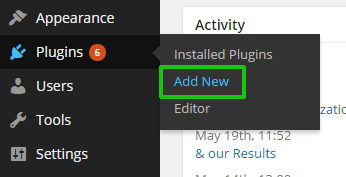
Start by clicking on "Plugins" and then "Add New" from your Wordpress admin panel as pictured below.

Continue by searching for "Bablic Localization" in the search field, as seen in the screenshot below.

Click on "Install Now" as seen below.

2) Activate the Bablic Localization Plugin
Now that you've downloaded and installed the plugin, it's finally time to activate it. Click on "Activate Plugin" - just like you see in the screenshot right below.

3) Setup the Bablic Localization Plugin
It's now time to play with the Bablic Wordpress Localization plugin settings. Let's head back to the Plugins section in your Wordpress dashboard and find the Bablic plugin, then click on "Settings" - exactly as you see below in the detailed image.

Finally, the last step is to just click "Start Now".

You'll now be in the Bablic Localization editor which will allow you to choose from machine or professional human translation, add more languages, manually edit elements (text, images, CSS) just by right-clicking on them and more features.
If you need any help translating Wordpress using Bablic simply email [email protected] - we're here to help.
Keep in mind, you can also start translating your Wordpress site simply by entering your URL right on Bablic.com and then install the plugin once you're satisfied with your results.
